Easy Sugar-Free Dairy-Free Chocolate Ice Cream
This post may contain affiliate links from which I will earn a commission. Learn more in our disclosure.
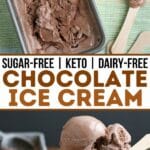
If you love healthy ice cream, but don't love the cost of the spendy pints in the store, you'll love this Sugar-Free Dairy-Free Chocolate Ice Cream. It's so easy and delicious, it's sure to be a new favorite in your home.

Chocolate Ice Cream that's good for you? Yes, it's totally possible.
I've shared other Delicious Vegan Ice Creams on the blog before, like Vegan Mint Chocolate Chip Ice Cream, Dairy-Free Chocolate Almond Chip Ice Cream, Lemon Poppyseed Ice Cream, and Mocha Chip Ice Cream, but today I'm sharing one of the best. Just basic Vegan Chocolate Ice Cream.

Why You'll Love This Ice Cream
Instead of feeling guilty after eating a pint, you can enjoy the chocolate creaminess in this dessert while knowing that it is full of nourishing ingredients.
It's also so simple to make, taking just minutes aside from the freezing time.
This ice cream is also suitable or adaptable for almost every special diet. And it's amazingly rich and creamy.

Ice Cream Maker Tips
I used the Cuisinart Ice Cream Maker for this recipe. It worked fine, but you really have to have the mixture chilled prior to making desserts in this maker. Otherwise, it will be quite runny (albeit yummy) and will need to be solidified in the freezer if you want it to be scoopable.
If you decide to freeze it and it gets too hard to scoop, try this handy anti-freeze ice cream scoop.
Recipe Notes and Substitutions
- Cocoa: If you like, you can also use raw cacao instead of cocoa, or use carob powder for AIP.
- Stevia Extract Alternatives: About 95 drops of liquid stevia can be used instead of the stevia extract. Also, you could use 9 1/2 tablespoons honey, maple syrup, or coconut sugar for AIP is another option that isn't low-carb. Any other sweetener can be used as well. Just use an equivalent of one cup of sugar, or to taste.
- MCT Oil: I included MCT Oil in this recipe for creaminess. You can also try another oil like avocado oil or coconut oil, but you do need to blend them in quickly. I wouldn't use olive oil due to its heavier flavor.
- THM: This recipe qualifies as an “S” for those on the Trim Healthy Mama plan as long as you do not use arrowroot.
- Serving Tip: The texture of this chocolate coconut milk ice cream, freshly churned, resembles the soft serve variety, but once frozen it will be closer to traditional ice cream. While the gelatin keeps this ice cream from getting too icy in the freezer, it still freezes pretty hard, so I recommend setting it out about 15 minutes before serving.
Special Diet Options
AIP: Instead of cocoa, use carob powder for AIP and an AIP sweetener like coconut sugar, maple syrup, or honey instead of stevia.
Low-carb / Keto: If desired, omit the arrowroot. Using the MCT oil should provide sufficient creaminess.
So what are you waiting for? Pull out your ice cream maker and whip up a batch of this tonight. For more fun, top it with this Homemade Magic Shell or even this Sugar-free Blueberry Sauce (or both!) for a fantastically chocolate treat.

Sugar-free Dairy-free Chocolate Ice Cream
Ingredients
- 796 ml full-fat coconut milk (about 2 cans)
- 13 tablespoons cocoa powder
- 1/2 teaspoon salt
- 1/4 teaspoon stevia extract
- 2 1/2 teaspoons freshly-squeezed lemon juice
- 1 dash vanilla
- 1-3 tablespoons MCT oil (optional–for creaminess. See Recipe Notes)
- 1 tablespoon arrowroot powder (optional thickener; use extra gelatin for low carb)
- 1 teaspoon gelatin (optional–as thickener; use extra arrowroot for vegan)
Instructions
- Chill coconut milk prior to starting, if possible.
- Mix the coconut milk (reserving ¼ cup), cocoa (or carob), MCT oil, salt, stevia (or other sweeteners), lemon juice, and arrowroot powder (if using it) in a blender (like a Vitamix or a Blendtec), with a mixer, or by hand.
- Take 3 tablespoons of the above ice cream mixture and place it into a small bowl. Sprinkle the gelatin over the mixture (do not pour into a clump) and let soften for 5 minutes.
- After 5 minutes, stir the gelatin in (it should have the consistency of applesauce.
- Heat up the reserved ¼ cup of coconut milk (until steamy, but not boiling).
- Slowly pour the heated coconut milk into the gelatin mixture from step 3, whisking while you do. Continue to whisk until gelatin is dissolved.
- Pour gelatin mixture into the ice cream mixture from step 2 slowly, stirring to combine.
- Follow manufacturer's directions for your ice cream maker.
- Store any extras in the freezer.
Notes
-
- Cocoa: If you like, you can also use raw cacao instead of cocoa, or use carob powder for AIP.
-
- Stevia Extract Alternatives: About 95 drops of liquid stevia can be used instead of the stevia extract. Also, you could use 9 1/2 tablespoons honey, maple syrup, or coconut sugar for AIP is another option that isn't low-carb. Any other sweetener can be used as well. Just use an equivalent of one cup of sugar, or to taste.
-
- MCT Oil: I included MCT Oil in this recipe for creaminess. You can also try another oil like avocado oil or coconut oil, but you do need to blend them in quickly. I wouldn't use olive oil due to its heavier flavor.
-
- THM: This recipe qualifies as an “S” for those on the Trim Healthy Mama plan as long as you do not use arrowroot.
-
- Serving Tip: The texture of this chocolate coconut milk ice cream, freshly churned, resembles the soft serve variety, but once frozen it will be closer to traditional ice cream. While the gelatin keeps this ice cream from getting too icy in the freezer, it still freezes pretty hard, so I recommend setting it out about 15 minutes before serving.
Nutrition
Nutritional information is provided as a courtesy and is an estimate only. It may vary depending on ingredient brands, substitutions, and preparation methods. Optional ingredients are not included. Net carbs are typically calculated by subtracting fiber and sugar alcohols (such as erythritol) from total carbohydrates. This information should not be relied upon for medical or nutritional purposes.
What is your favorite flavor of ice cream?
I guess I need to look for recipes that don’t use stevia, liquid or powder! I don’t use stevia at all…hate the taste, and don’t really like it at all. So……..how much of a powder or granulated sugar substitute should I do for both the stevias…? I use allulose. (1 T??)
Also, how much extra gelatin should be used if you don’t use arrowroot? (extra tsp?)
As I said, maybe I shouldn’t try to convert this recipe but look for one meeting my criteria…
Hi Carol! Do you not like liquid stevia? Either way, I just updated the post and added notes that should help you more. I don’t think you’ll need the gelatin but you could do 1 teaspoon if you’d like! Hope that helps!
No, I don’t like ANY stevia! Including the homemade versions of dry (from dried stevia leaf) or liquid made by myself! I just don’t like the bitter aftertaste and STRONG flavor.
I decided to try recipes that don’t call for it for this type of dessert.
I LOVE SO many of your recipes so it shouldn’t make you sad I don’t like just 1!!
You can totally substitute whatever sweetener you’d like per the directions in the post. I would powder it first, however. It’s such a simple and good recipe I think you’ll love it!